 | |
| Battle of Yavin | |
| Type: | Fictional event |
| Category: | Battle |
| Continuity: | Star Wars |
| Dates: | 0 BBY/0 ABY |
| Locations: | Yavin IV; Death Star I |
| Participants: | The Galactic Empire; Alliance to Restore the Republic |
| Appearances: | Star Wars Episode IV: A New Hope |
The Battle of Yavin was a fictional military engagement featured in the Star Wars mythos. It was presented in the 1977 film Star Wars Episode IV: A New Hope and was the climactic battle of the film. The Battle of Yavin was the epic space battle between the forces of the Rebel Alliance and their struggle to destroy the Empire's super-station the Death Star. It is considered the first major battle in the Galactic Civil War and the second victory of the Rebel Alliance over the Empire.
History[]
The Battle of Yavin was a military engagement that took place between the forces of the Imperial Galactic Empire and the Alliance to Restore the Republic (commonly referred to as the Rebel Alliance). The name is taken from the planet Yavin, a gas giant whose fourth moon was the location of the Alliance's secret headquarters.
The events leading up to the battle began with a secret Rebel mission known as Operation: Skyhook. Operation: Skyhook involved stealing the design schematics for the Empire's super-space station the Death Star. An Imperial defector named Kyle Katarn, having only recently thrown in with the Rebels went on a mission to the planet Danuta, where he acquired a partial schematic of the Death Star blueprints. He delivered them to Alliance agent Leia Organa aboard her consular ship, the Tantive IV. More information relating to the Death Star was obtained on the planet Toprawa. [1]
Delivering the stolen plans to Alliance leaders on Yavin IV proved successful, but it was not without consequence. Leia had managed to upload the computer information into the memory circuits of the astromech droid R2-D2 and send him to the planet Tatooine with instructions to enlist the aid of former Jedi and Clone War veteran Obi-Wan Kenobi. Moments later however, she was captured by Darth Vader and the 501st Legion of Imperial Stormtroopers and imprisoned aboard the Death Star. The high commander of the Death Star, Grand Moff Wilhuff Tarkin decided to make an example of Leia by using the station's super-laser to destroy her home planet of Alderaan. [2]
With the help of Obi-Wan Kenobi, a Tatooine farmer named Luke Skywalker, a pilot and smuggler named Han Solo, his wookiee co-pilot Chewbacca and the droids R2-D2 and C-3PO, Leia managed to escape from the Death Star and brought the stolen schematics safely back to the Rebel base on Yavin IV. Before escaping from the Death Star however, Grand Moff Tarkin had a tracking beacon secretly installed on Hans's ship, the Millennium Falcon and was able to use it to learn the location of the Rebel forces. [2]
On Yavin IV, Alliance leaders Jan Dodonna, Vanden Willard, Bob Hudsol analyzed the recovered data and determined a weakness in the structure's design which they had hoped to exploit. General Dodonna called a meeting of all the fighter pilots in attendance, which consisted of members of Red Squadron, Gold Squadron and Blue Squadron. Using a holographic projection of the station, he pointed out a small thermal exhaust port, which led directly into the Death Star's reactor chamber. In theory, a precise hit from a proton torpedo would cause a chain reaction which would destroy the entire station. However, the port itself was only two meters wide. Some pilots, such as Wedge Antilles, were skeptical as to their ability to accurately shoot such a remote target. As it was however, this was the only option they had. [2]
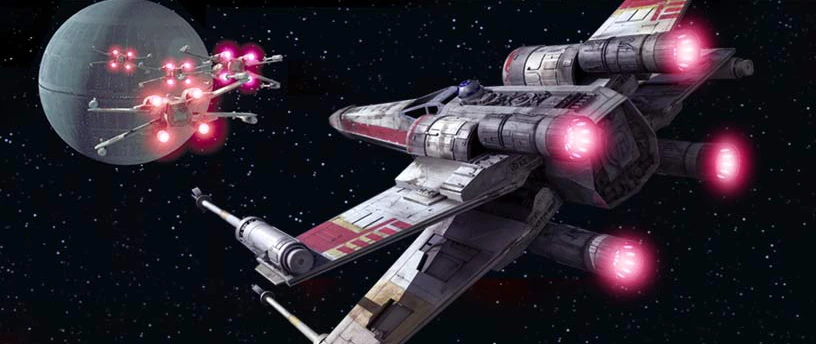
A fleet of starfighters, consisting of twenty-two X-wing fighters, eight Y-wing fighters and two R22 Spearhead fighters launched from Yavin IV to combat Imperial forces as the Death Star loomed into view. During the initial phase of the attack, the Death Star was still obscured by the planet Yavin and was not yet in range to fire its super-laser. As the Death Star skirted the perimeter of the planet, the Rebel squadrons entered the trench canyons that ran across the surface of the station. The Death Star trench was defended by ion cannons and turbo laser turret cannons. This arsenal however, was designed for combat against capital starships and was virtually ineffective against smaller snub fighters. From within the safety of his command center, Grand Moff Tarkin felt that the Rebel fleet presented no threat to the station and was confidant that the Death Star would destroy the Alliance in "one swift stroke". Tarkin's second-in-command, the Sith Lord Darth Vader however, was not as quick to dismiss the material threat the Alliance presented as Tarkin had. [2]
When the laser batteries failed to destroy the Rebel ships, the order came down to assemble the TIE fighter crews. The turbo lasers were de-activated, allowing the TIE fighters the ability to combat the Rebels ship-to-ship without risk of being shot down by friendly fire. Darth Vader chose to join the battle, piloting his personal TIE Advanced x1 Starfighter along with the Black Squadron TIE fighter group down the trench run.
While the ships engaged one another, Red Leader Garvin Dreis made a bombing run towards the exhaust port. He was the first to reach the zone, but his shot missed, impacting the surface of the Death Star. The Rebels managed to clear the trench of TIE fighters, but Vader, and two pilots of Black Squadron were still doggedly pursuing them. Vader shot down Red Leader as well as Biggs and one by one, the other Rebel ships began to fall. Wedge Antilles' X-wing suffered critical damage, forcing him to drop out of the battle. Wedge survived however, and managed to get his crippled ship back to base. Within short order, the only pilots left were Vader and Luke Skywalker.
Vader sensed the power of the Force with this sole remaining pilot, but he had no idea that the man he was about to fire upon was actually his own son. During the second bombing run, Vader got a lock on Luke's ship and prepared to blast him into pieces. As it turned out, Han Solo and Chewbacca, on board the Millennium Falcon arrived just in time to save Luke. The Falcon shot one of the Black Squadron TIEs and sent into colliding into the second, which exploded on the walls of the trench. He then fired on Vader's ship, disabling it and it spun out of control, flying away from the scene of battle. With no more enemy combatants to concern himself with, Luke concentrated on completing the mission. Relying upon the Force to guide him, he switched off his targeting computer and manually fired the "kill shot" that destroyed the Death Star.
Back on Yavin IV, a large celebration was held at the Great Massassi Temple. Han Solo and Luke Skywalker were awarded medals of valor for their participation in the destruction of the Death Star. [2]
Combatants[]
Rebel Alliance
Ships
|
Galactic Empire
Ships |
Notes & Trivia[]

- The Battle of Yavin is also used as the timekeeping standard for chronologizing events in the Star Wars universe. Events that take place before Star Wars Episode IV: A New Hope are said to take place in Year BBY (before the Battle of Yavin), while events that take place after Star Wars Episode IV: A New Hope occur in Year ABY (after the Battle of Yavin).
- In the film, the only Rebel pilots identified by name are Luke Skywalker, Biggs Darklighter, Jek Porkins and Wedge Antilles. Biggs and Wedge are only referred to by their first names, while Porkins is addressed by his last name. Garven Dreis is identified only as Red Leader and Jon Vander is identified only as Gold Leader. Biggs' surname is referenced in the Star Wars novelization.
- In the novelization, the Alliance squadrons as well as their respective call signs are different from what they were in the film. Taking information from the shooting script, Red Squadron is identified as Blue Squadron while the Y-wing squadron (Gold) is referred to as Red Squadron. These changes also appeared in issue #6 of the Marvel Comics Star Wars comic book series, which adapted the film.
- Battle of Yavin was also the name of an Imperial Customs frigate featured in the novel X-Wing: Rogue Squadron. [4]
See also[]
Media
The World of Star Wars
Star Wars miscellaneous
External Links[]
References[]
 One or more sections of this article is incomplete, and requires additional information to bring this article to a higher standard of quality. You can help Headhunter's Holosuite Wiki by editing this page, provide missing information or improve outdated sections. |